CHOU
[MSRDS] Robot Service - Motor Service 알아보기 본문
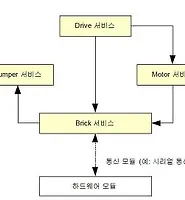
로봇 모터를 구동하기 위한 서비스를 개발하기 위해서는 Robotics.Common.proxy.dll에 정의되어 있는 Motor 클래스를 이용해야 하는데 MSRDS 네이버 카페에 김영준 수석님께서 올려주신 예제를 수행해 보면서 알아보겠습니다.

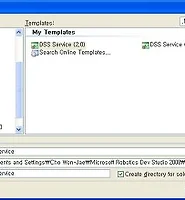
1. 우선 DSS 프로젝트 창을 열어서 프로젝트 명을 넣어주고 시작합니다. 저장할때는 MSRDS 설치 폴더 아래 Samples 아래 저장해 주시기 바랍니다. 나중에 서비스 테스트 할때 용이 합니다^^.

실행하면 아래의 화면이 나오는데 우선은 그냥 OK 하시면 됩니다.

2. 다음은 레퍼런스를 추가하는 일인데, RoboticsCommon.proxy.dll 파일을 참조 추가해 줍니다. 이때, 느낌표가 나오는 부분이 나온다면, 이 경로 또한 다시 참조해줘서 수정해 줘야 합니다.

참조를 다시해줘서 느낌표가 안나오게 올바르게 다시 설정해 주고, 추가도 완료해야 합니다.

참조추가는 Robotics 설치폴더 아래 bin 폴더에 찾아보시면 있습니다.

느낌표가 사라지고, 레퍼런스 추가도 완료 했습니다.
3. 아래 코드와 같이 프로젝트명types.cs 파일을 오픈한 다음에 contract 관련 모듈만 남겨두고 다른것은 모두 제거를 합니다.
using System;
using System.Collections.Generic;
using System.ComponentModel;
using Microsoft.Ccr.Core;
using Microsoft.Dss.Core.Attributes;
using Microsoft.Dss.ServiceModel.Dssp;
using Microsoft.Dss.ServiceModel.DsspServiceBase;
using W3C.Soap;
namespace testMotorService
{
public sealed class Contract
{
[DataMember]
public const string Identifier = "http://schemas.tempuri.org/2009/04/testmotorservice.html";
}
}
모터서비스를 만들 때 RoboticsCommon.proxy.dll 에 있는 클래스들을 사용하기 때문에, 맨 처음 나온 클래스들을 필요가 없기 때문에 불필요한 코드를 지워주었습니다.
4. 프로젝트명.cs 코드를 열어서 불필요한 주석 부분을 제거하고 이해하는 것이 쉽다고 김영준 수석님의 예제에 나와있으므로, 저도 주석이나 필요 없는 내용을 제거하고 따라해 보겠습니다.
using System;
using System.Collections.Generic;
using System.ComponentModel;
using Microsoft.Ccr.Core;
//add using
using Microsoft.Dss.Core;
using System.Xml;
using Microsoft.Dss.Core.Attributes;
using Microsoft.Dss.ServiceModel.Dssp;
using Microsoft.Dss.ServiceModel.DsspServiceBase;
using W3C.Soap;
using submgr = Microsoft.Dss.Services.SubscriptionManager;
//add using
using motor = Microsoft.Robotics.Services.Motor.Proxy;
namespace testMotorService
{
[Contract(Contract.Identifier)]
[DisplayName("testMotorService")]
[Description("testMotorService service (no description provided)")]
//add code
[AlternateContract(motor.Contract.Identifier)]
class testMotorService : DsspServiceBase
{
//add code
private motor.SetMotorPowerRequest _state = new motor.SetMotorPowerRequest();
[ServicePort("/testMotorService", AllowMultipleInstances = true)]
//add code
private motor.MotorOperations _mainPort = new motor.MotorOperations();
public testMotorService(DsspServiceCreationPort creationPort)
: base(creationPort)
{
}
protected override void Start()
{
base.Start();
}
//add code
[ServiceHandler(ServiceHandlerBehavior.Exclusive)]
public virtual IEnumerator<ITask> UpdateHandler(motor.SetMotorPower update)
{
LogInfo(LogGroups.Console, "[[[모터 수신값]]] " + update.Body.TargetPower.ToString());
update.ResponsePort.Post(DefaultUpdateResponseType.Instance);
yield break;
}
}
}
위의 빨간색 글자 부분이 추가 된 코드 입니다. MSRDS에서는 Contract 또한 공통적인 값을 사용하면서, 항상 인터페이스의 스키마를 같은 형태로 일치시킬 수 있습니다. 이렇게 어떠한 로봇에 적용을 하던간에, 항상 모터 서비스를 인식하기 위해 AlternateContract를 사전에 정의 된 값으로 지정합니다.
[AlternateContract(motor.Contract.Identifier)]

SetMotorPower Update 핸들러는 SetMotorPowerRequest 값을 받아 들이는데, 위의 이미지 처럼, 모터제어하기 위해 필요한 값은 TargetPower 필드에 저장되어 넘어 옵니다. 코드에서 update Handler 부분을 살펴 보면 됩니다.
5. VPL 을 생성하여 테스트를 해보겠습니다.
우선 생성한 코드를 빌드하고 서비스를 검색해 보시면 자신이 만든 서비스를 볼 수 있습니다. 제가 만든 모터 서비스는 DSSMotorService 입니다. 아래와 같이 다이어그램을 구성해 줍니다.

우선 DirectionDialog 와 if 를 연결해 줄때 DirectionDialog 아래 Notify 부분에 연결을 해주고 아래와 같이 설정해 줍니다.

그리고 If - merge - myService 를 연결해 주고 아래와 같이 설정해 줍니다.

값은 Value 값 입니다.

완성된 다이어 그램 모습 입니다.

저장해서 Run 해보면 다음과 같이 결과가 발생합니다. 포워드 버튼을 누르면 값이 출력 되는 것을 볼 수 있습니다.

SetMororPower를 이용하여 TagetPower를 이용해 데이터를 넘기는 모습을 볼 수 있습니다.
아래 영상은 결과가 실행되는 모습이니 보시고 참고 하시기 바랍니다.
참고자료
1. http://cafe.naver.com/msrskorea MSRDS 네이버 공식카페
(모터 서비스 만들기 예제 - 김영준 수석님 제작)
2. 예제 코드 파일(VS2008)
 DSSMotorService.zip